

Introduction:
Flutter, renowned for its expedited development and aesthetically pleasing user interfaces, has been gaining traction among developers for crafting cross-platform applications. With the advent of Flutter Web, developers can now extend their existing Flutter expertise to target web browsers as well. A pivotal aspect of Flutter Web development is JavaScript integration, which facilitates interaction between developers’ applications and the underlying web platform. In this blog, we’ll delve into the realm of JavaScript integration in Flutter Web, exploring its significance, applications, pros and cons, limitations, future scope, best practices, and more.
If you’re looking for the best Flutter app development company for your mobile application then feel free to contact us at — support@flutterdevs.com.
Table of Contents
Introduction
Understanding Flutter Web Flutter:
Leveraging JavaScript in Flutter Web
Introduction to JavaScript Integration
Demo: Retrieving User’s Location
JavaScript Functions
Showcasing with a Live Demo
Limitations and Future Scope
Conclusion
References
Understanding Flutter Web Flutter:
Google’s UI toolkit for building natively compiled applications for mobile, web, and desktop from a single codebase, has garnered widespread acclaim. Flutter Web extends Flutter’s capabilities to target modern web browsers, empowering developers to create interactive web applications with the same codebase they use for mobile and desktop platforms. Equipped with Flutter’s declarative UI framework and hot reload feature, developers can craft web applications with stellar performance and rapid development cycles.
Pros:
- Enables access to browser APIs and third-party JavaScript libraries.
- Facilitates seamless integration of existing web technologies.
- Enhances the functionality and interactivity of Flutter Web applications.
Cons:
- Introduces complexity and potential errors when interacting with JavaScript code.
- May increase application size and affect performance if not optimized properly.
- Requires understanding of both Dart and JavaScript languages for effective integration.
Leveraging JavaScript in Flutter Web
Using JavaScript in Flutter Web allows developers to leverage existing web technologies and libraries while building web applications with Flutter. Here are some reasons why integrating JavaScript into Flutter web can be beneficial:
- Access to Web APIs: JavaScript provides access to a wide range of web APIs and browser functionalities that may not be directly available in Flutter. By integrating JavaScript, developers can tap into these APIs and leverage features such as geolocation, device orientation, and more.
- Third-Party Libraries: Many third-party libraries and frameworks are written in JavaScript and designed for web development. Integrating JavaScript in Flutter web allows developers to use these libraries seamlessly within their Flutter applications, expanding the range of available tools and resources.
- Web-specific Functionality: Certain web-specific functionality, such as interacting with the browser’s Document Object Model (DOM) or handling events like mouse clicks and keyboard input, can be more efficiently implemented using JavaScript. Integrating JavaScript in Flutter web enables developers to handle these tasks effectively.
- Hybrid Development: In some cases, developers may want to build hybrid applications that combine Flutter components with existing web content or JavaScript-based frameworks like React or Angular. Integrating JavaScript in Flutter web facilitates the creation of hybrid applications that leverage the strengths of both Flutter and web technologies.
- Legacy Code Integration: For projects that involve migrating or integrating with existing web applications or codebases, using JavaScript in Flutter web can streamline the integration process and ensure compatibility with legacy systems.
Overall, integrating JavaScript in Flutter web opens up new possibilities for building feature-rich, interactive web applications that leverage the strengths of both Flutter and web technologies.
Introduction to JavaScript Integration
JavaScript integration serves as a cornerstone in Flutter Web development, facilitating seamless communication between Flutter code and the underlying web platform. By harnessing JavaScript interop, developers can access browser APIs, incorporate third-party JavaScript libraries, and execute other web-specific tasks from within their Flutter applications. In Flutter, JavaScript interop is realized through the dart:js library, which establishes a bridge between Dart and JavaScript environments.
import 'dart:js' as js;void main() {
js.context.callMethod('console.log', ['Hello from Dart!']);
}
Use Cases for JavaScript Integration
JavaScript integration in Flutter Web unlocks a myriad of possibilities for developers. Common applications include accessing browser APIs like geolocation or local storage, integrating third-party JavaScript libraries for enhanced functionality, and interfacing with web services via JavaScript functions. By seamlessly integrating JavaScript code into their Flutter applications, developers can leverage existing web technologies to enrich the user experience.
dartCopy code// Example of accessing browser's geolocation API using JavaScript interop
void getCurrentLocation() {
var position = js.context.callMethod('getCurrentPosition', []);
// Process position data
}
Interfacing with JavaScript Code
Interfacing with JavaScript code in Flutter Web entails invoking JavaScript functions from Dart and vice versa. With dart:js, developers can invoke JavaScript functions and exchange data between Dart and JavaScript environments. This bidirectional communication empowers developers to seamlessly integrate JavaScript functionalities into Flutter applications, thereby harnessing the full potential of the web platform.
dartCopy code// Example of invoking a JavaScript function from Dart code
void callJavaScriptFunction() {
js.context.callMethod('myJavaScriptFunction', ['argument']);
}
Integrating Third-Party JavaScript Libraries
Flutter Web developers can tap into the expansive ecosystem of third-party JavaScript libraries to augment their applications. Integration of these libraries into Flutter projects is facilitated through JavaScript interop. Whether it involves data visualization with Chart.js or DOM manipulation with jQuery, developers can seamlessly incorporate popular JavaScript libraries into their Flutter Web applications and leverage their robust features.
Demo: Retrieving User’s Location
To demonstrate JavaScript integration in Flutter Web, let’s create a simple application that retrieves the user’s location using JavaScript’s geolocation API:
To get geolocation using JavaScript in Flutter Web, we can use the Geolocation API provided by modern web browsers. Here’s a step-by-step guide:
Step 1: Import dart:js Libraryi
mport 'dart:js' as js;Step 2: Call JavaScript Geolocation API
void getLocation() {
if (js.context.hasProperty('navigator') &&
js.context['navigator'].hasProperty('geolocation')) {
js.context.callMethod('navigator.geolocation.getCurrentPosition',
[showPosition, showError]);
} else {
print('Geolocation is not supported by this browser.');
}
}
Step 3: Define Callback Functions
void showPosition(js.JsObject position) {
double latitude = position['coords']['latitude'];
double longitude = position['coords']['longitude'];
print('Latitude: $latitude, Longitude: $longitude');
}void showError(js.JsObject error) {
String errorMessage;
switch (error['code']) {
case 1:
errorMessage = 'Permission denied.';
break;
case 2:
errorMessage = 'Position unavailable.';
break;
case 3:
errorMessage = 'Timeout.';
break;
default:
errorMessage = 'Unknown error.';
break;
}
print('Error: $errorMessage');
}
Step 4: Trigger Geolocation Retrieval
You can trigger the getLocation function when the user interacts with a button or at any appropriate event in your Flutter web application.
ElevatedButton(
onPressed: getLocation,
child: Text('Get Location'),
)
Keep In Mind:
- Dependency on the user’s device and browser settings.
- Limited support in some older browsers or in environments where geolocation services are restricted.
- Geolocation accuracy may vary based on factors such as device capabilities, network conditions, and user consent.
- Privacy concerns may arise due to the collection of location data from users.
JavaScript Functions
Flutter Web provides developers with the capability to seamlessly integrate custom JavaScript functions into their applications, thereby extending the functionality and interactivity of their web experiences. Let’s explore some JavaScript functions that can be effectively integrated into Flutter Web applications.
1. getPlatform(): This function leverages JavaScript’s navigator.platform to retrieve essential platform information. By accessing the user’s device platform, developers can tailor their application’s behavior to provide a more personalized experience. For example, they can adjust layout, content, or feature availability based on whether the user is on a desktop, mobile device, or tablet.
function getPlatform() {
return navigator.platform;
}
Usage Scenario: Adapting UI layout and feature availability based on whether the user is on a desktop, mobile device, or tablet.
2. jsPromiseFunction(message): Demonstrating the usage of JavaScript promises within Flutter Web, this function showcases the power of asynchronous programming. Promises enable developers to handle asynchronous operations more efficiently, such as fetching data from a server or executing time-consuming tasks. By integrating JavaScript promises into Flutter Web applications, developers can ensure smooth and responsive user interactions, even when dealing with complex asynchronous tasks.
async function jsPromiseFunction(message) {
let promise = new Promise(function(resolve, reject) {
resolve('Hello : ' + message);
});
let result = await promise;
return result;
}
Usage Scenario: Fetching data from a server or executing complex tasks asynchronously while maintaining app responsiveness.
3. jsOpenTabFunction(url): By employing this function, developers can enhance user navigation within their Flutter Web applications. It opens a new browser tab with the specified URL and resolves a promise when the tab is closed. This functionality is particularly useful for scenarios where users need to interact with external content or perform tasks in parallel without disrupting their current workflow. For instance, developers can implement features like opening documentation pages, external links, or multimedia content in separate tabs, providing users with a seamless browsing experience.
async function jsOpenTabFunction(url) {
let promise = new Promise(function(resolve, reject) {
var win = window.open(url, "New Popup Window", "width=800,height=800");
var timer = setInterval(function() {
if (win.closed) {
clearInterval(timer);
resolve('Closed');
}
}, 300);
});
let result = await promise;
return result;
}
Usage Scenario: Opening external links, documentation pages, or multimedia content in separate tabs without interrupting the user’s workflow.
Integrating these JavaScript functions into Flutter Web applications empowers developers to leverage the full potential of web technologies and browser capabilities. Whether it’s accessing device-specific information, handling asynchronous tasks, or enhancing navigation, JavaScript integration opens up a world of possibilities for crafting rich and immersive web experiences with Flutter.
import 'package:flutter/material.dart';
import 'package:js_flutter_web/js/js_helper.dart';
import 'dart:js' as js;
void main() {
runApp(const MyApp());
}

class MyApp extends StatelessWidget {
const MyApp({Key? key}) : super(key: key);

@override
Widget build(BuildContext context) {
return MaterialApp(
debugShowCheckedModeBanner: false,
title: 'JS In Flutter Web',
theme: ThemeData(
primarySwatch: Colors.blue,
),
home: const MyHomePage(title: 'JS In Flutter Web'),
);
}
}

class MyHomePage extends StatefulWidget {
const MyHomePage({Key? key, required this.title}) : super(key: key);

final String title;

@override
State<MyHomePage> createState() => _MyHomePageState();
}

class _MyHomePageState extends State<MyHomePage> {
final JSHelper _jsHelper = JSHelper();

String platForm = '';
String dataFromJS = '';
String locationMessage = '';

@override
Widget build(BuildContext context) {
return Scaffold(
appBar: AppBar(
title: Text(widget.title),
backgroundColor: Colors.red.shade400,
),
body: Center(
child: Column(
mainAxisAlignment: MainAxisAlignment.center,
children: <Widget>[
ElevatedButton(
style: ElevatedButton.styleFrom(
backgroundColor: Colors.red.shade400,
),
child: const Text(
"Click to Check Platform",
style: TextStyle(color: Colors.white),
),
onPressed: () {
getPlatform();
},
),
const SizedBox(height: 16),
if (platForm.isNotEmpty) ...[
Text(
'Current Platform is : $platForm',
style: const TextStyle(
fontSize: 20, color: Colors.deepOrangeAccent),
),
const SizedBox(height: 16),
],
const SizedBox(height: 16),
ElevatedButton(
style: ElevatedButton.styleFrom(
backgroundColor: Colors.red.shade400,
),
child: const Text(
"Explore Flutter",
style: TextStyle(color: Colors.white),
),
onPressed: () async {
// Loader
String dataFromJS = await _jsHelper.callOpenTab();
print("callDataFromJS ----------- $dataFromJS");
},
),
const SizedBox(height: 16),
ElevatedButton(
style: ElevatedButton.styleFrom(
backgroundColor: Colors.red.shade400,
),
child: const Text(
"Call JS Promise Function",
style: TextStyle(color: Colors.white),
),
onPressed: () async {
setState(() {});
dataFromJS = await _jsHelper.callJSPromise();
print("dataFromJS ----------- $dataFromJS");
},
),
const SizedBox(height: 16),
Text(
dataFromJS.toString(),
style:
const TextStyle(fontSize: 20, color: Colors.deepOrangeAccent),
),
const SizedBox(height: 20),
ElevatedButton(
style: ElevatedButton.styleFrom(
backgroundColor: Colors.red.shade400,
),
onPressed: getLocation,
child: const Text('Get Location'),
),
const SizedBox(height: 16),
Text(
locationMessage,
style:
const TextStyle(fontSize: 20, color: Colors.deepOrangeAccent),
),
],
),
),
);
}

void getPlatform() {
setState(() {});
platForm = _jsHelper.getPlatformFromJS();
print(platForm);
}

void getLocation() {
if (js.context.hasProperty('navigator') &&
js.context['navigator'].hasProperty('geolocation') &&
js.context['navigator']['geolocation']
.hasProperty('getCurrentPosition')) {
js.context['navigator']['geolocation']
.callMethod('getCurrentPosition', [showPosition, showError]);
} else {
setState(() {
locationMessage = 'Geolocation is not supported by this browser.';
});
}
}

void showPosition(js.JsObject position) {
double latitude = position['coords']['latitude'];
double longitude = position['coords']['longitude'];
setState(() {
locationMessage = 'Latitude: $latitude, Longitude: $longitude';
});
}

void showError(js.JsObject error) {
String errorMessage;
switch (error['code']) {
case 1:
errorMessage = 'Permission denied.';
break;
case 2:
errorMessage = 'Position unavailable.';
break;
case 3:
errorMessage = 'Timeout.';
break;
default:
errorMessage = 'Unknown error.';
break;
}
setState(() {
locationMessage = 'Error: $errorMessage';
});
}
}
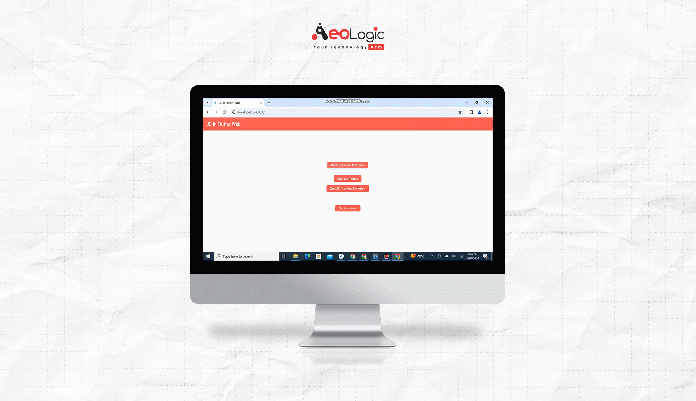
Showcasing with a Live Demo
Limitations and Future Scope:
While JavaScript integration in Flutter Web offers numerous benefits, it also comes with certain limitations. These include potential compatibility issues with future Flutter versions, overhead associated with maintaining JavaScript interoperability, and limitations in accessing certain browser APIs directly from Dart code. However, with ongoing improvements in Flutter Web and Dart language features, these limitations are expected to diminish over time. Additionally, the future scope of JavaScript integration in Flutter Web holds promise for further enhancing web application development, with potential advancements in performance optimization, tooling support, and expanded JavaScript interoperability.
Conclusion:
JavaScript integration plays a pivotal role in Flutter Web development, empowering developers to harness the capabilities of the web platform within their Flutter applications. By comprehending the fundamentals of JavaScript interop and exploring its applications, developers can craft resilient and feature-rich web applications with Flutter. As Flutter Web continues to evolve, JavaScript integration will remain instrumental, enabling developers to create immersive and captivating user experiences on the web.
References:
- Official Flutter Documentation: Flutter Web
- Dart Documentation: JavaScript Interop
In this blog, we’ve delved into the intricacies of JavaScript integration in Flutter Web, from its significance and applications to pros and cons, limitations, future scope, best practices, and more. Armed with this knowledge, developers can confidently explore and leverage JavaScript integration to craft innovative web applications with Flutter.
❤ ❤ Thanks for reading this article ❤❤
If I need to correct something? Let me know in the comments. I would love to improve.
Clap 👏 If this article helps you.
From Our Parent Company Aeologic
Aeologic Technologies is a leading AI-driven digital transformation company in India, helping businesses unlock growth with AI automation, IoT solutions, and custom web & mobile app development. We also specialize in AIDC solutions and technical manpower augmentation, offering end-to-end support from strategy and design to deployment and optimization.
Trusted across industries like manufacturing, healthcare, logistics, BFSI, and smart cities, Aeologic combines innovation with deep industry expertise to deliver future-ready solutions.
Feel free to connect with us:
And read more articles from FlutterDevs.com.
FlutterDevs team of Flutter developers to build high-quality and functionally rich apps. Hire a Flutter developer for your cross-platform Flutter mobile app project on an hourly or full-time basis as per your requirement! For any flutter-related queries, you can connect with us on Facebook, GitHub, Twitter, and LinkedIn.
We welcome feedback and hope that you share what you’re working on using #FlutterDevs. We truly enjoy seeing how you use Flutter to build beautiful, interactive web experiences.


